Implement an Android app protection policy
To create an Android app protection policy, use the following procedure:
- Navigate to the Microsoft Endpoint Manager admin center and sign in using your global admin account.
- In the navigation pane, select Apps.
- In the Apps blade, under Policy, select App protection policies.
- Select Create policy.
- In the Create policy drop-down list, select Android.
- On the Basics tab, enter the following information, and then select Next:
- Name Enter a name for your new policy.
- Description Enter an optional description.
- On the Apps tab, configure the following information, and then select Next:
•Target to apps on all device types
•Public apps
•Custom apps - On the Data protection tab, configure the DLP:
•Data transfer
•Encryption
•Functionality - Select Next, and then, on the Access requirements tab, configure the PIN and credential requirements that users must meet to access apps in a work context. Then select Next.
- On the Conditional launch tab, define the App conditions and Device conditions. Select Next.
- You must now assign the policy to group(s), as described in the “Create and manage groups for app assignment” section earlier in this chapter.
- Select Next, and then select Create.
Implement a Windows 10 app protection policy
To create a Windows 10 app protection policy, use the following procedure:
- Navigate to the Microsoft Endpoint Manager admin center and sign in using your global admin account.
- In the navigation pane, select Apps.
- In the Apps blade, under Policy, select App protection policies.
- Select Create policy.
- In the Create policy drop-down list, select Windows 10.
- On the Basics tab, enter the following information, and then select Next:
•Name Enter a name for your new policy.
•Description Enter an optional description.
•Enrollment state Choose Without enrollment or With enrollment. - On the Targeted apps tab, use one of the following links to define Protected Apps:
•Add Select this link, and then, in the Add apps blade, select the apps you want to protect and select OK.
•Import Select this link to upload an AppLocker XML file that contains a list of protected apps. - If you want, select Add or Import beneath the Exempt apps heading to configure any exemptions, then select Next.
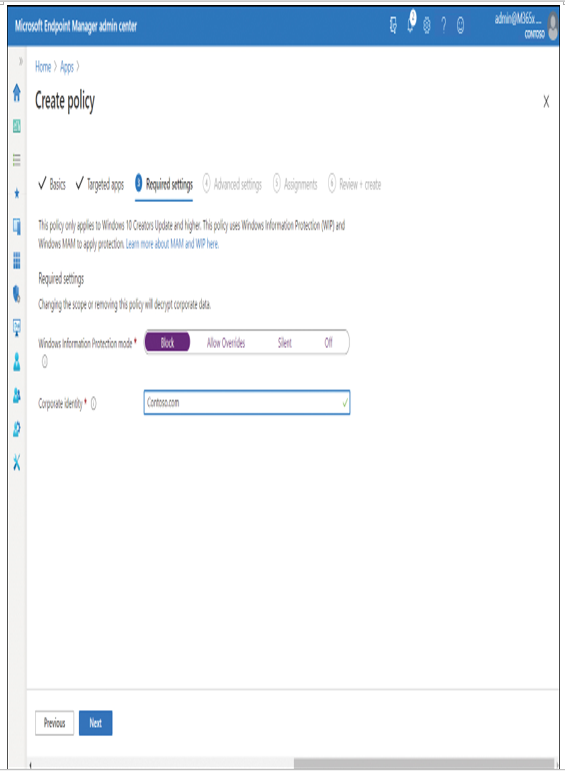
- On the Required settings tab, in the Windows Information Protection mode section displayed in Figure 4-44, select one of the following options to configure your desired level of Windows Information Protection:

Figure 4-44 Configuring the required settings in a Windows Information Protection policy
•Off WIP is disabled.
•Silent Users can relocate data from protected apps, but actions are logged.
• Allow Overrides Users are prompted when attempting to relocate data from a protected to a non-protected app. Users can override, but their actions are logged.
• Block Users are blocked from relocating data from a protected to a non-protected app.
- Corporate identity should be configured as your primary domain name. Select Next.
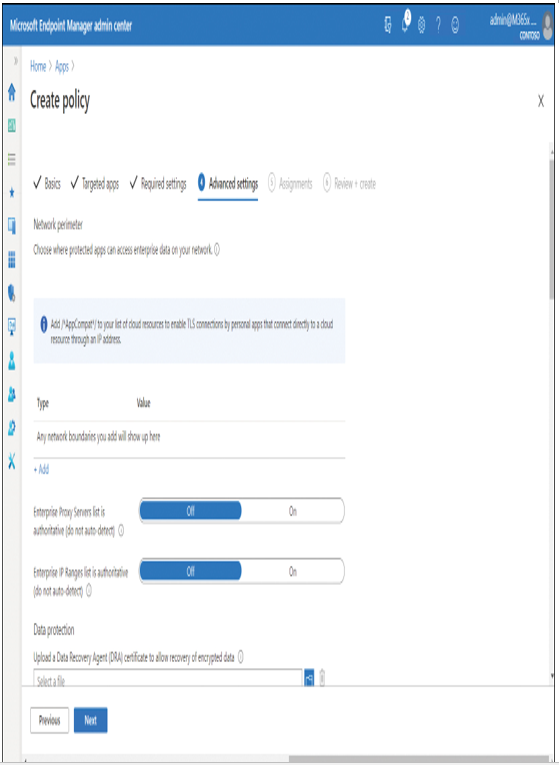
- On the Advanced settings blade, displayed in Figure 4-45, select and configure the following, and then select Next:

Figure 4-45 Configuring Advanced Settings in an app protection policy
•Network perimeter Define from where protected apps can access enterprise data on your network.
•Data protection Upload a certificate for data recovery of encrypted data, and then configure a number of settings, such as:
• Prevent corporate data from being accessed by apps when the device is locked.
• Revoke encryption keys on unenroll.
• Allow Windows Search Indexer to search encrypted items
• Access Configure Windows Hello for Business settings to control access to protected apps’ data.
- On the Assignments tab, assign the policy, as described in the “Add a Microsoft store app” section.
- Select Next and then select Create.


