Enable kiosk mode in Windows 10 using Windows Configuration Designer
Windows Configuration Designer enables you to create provisioning packages to configure kiosk mode. To use Windows Configuration Designer, use the following procedure:
- In Windows Configuration Designer, select Provision kiosk devices.
- In the New Project Wizard, on the Enter project details page, enter the name for your provisioning package and a meaningful description. For example, enter Kiosk, add a suitable description, and select Finish.
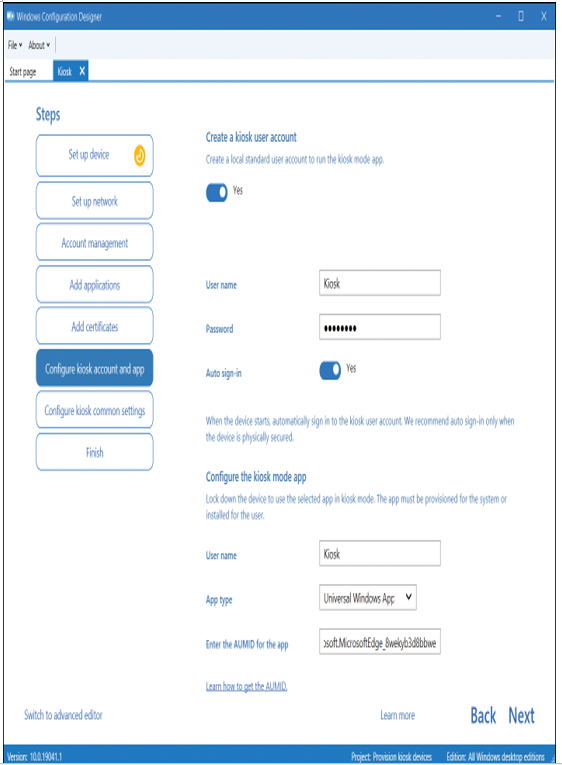
- On the new tab, select the Configure kiosk account and app button, as displayed in Figure 4-33.

Figure 4-33 Creating a kiosk configuration provisioning package
4. Under the Create a kiosk user account heading, enter the following information:
- User name This is the account that will be created for use as the kiosk user account.
- Password Enter the password for the user account.
- Auto sign-in Specify whether the user will sign in automatically when the computer is started.
5. Under the Configure the kiosk mode app heading, enter the following information:
- User name This is the account that will be used as the kiosk user account.
- App type Choose between Classic Windows App or Universal Windows App. If you choose the former, specify the path to the filename for the desktop app. If you choose the latter, enter the Application User Model Identity (AUMID) of the app. You can determine the AUMID of an app by using Windows PowerShell or File Explorer, or by editing the registry. To use Windows PowerShell, run the Get-StartApps cmdlet. The AppID is returned.
Need More Review? Find the Application user Model Id of an Installed App
To review further details about AUMID, refer to the Microsoft website at https://docs.microsoft.com/windows/configuration/find-the-application-user-model-id-of-an-installed-app.
- Select Next.
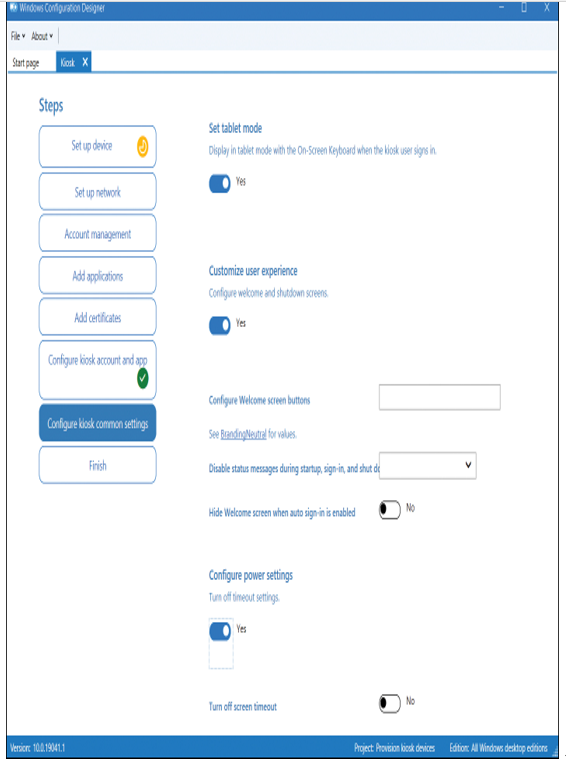
- As displayed in Figure 4-34, on the Configure kiosk common settings page, configure the following options:

Figure 4-34 Completing kiosk mode setup with provisioning package configuration
- Set tablet mode Display In Tablet Mode With The On-Screen Keyboard When The Kiosk User Signs In.
- Customize user experience If you choose Yes for Configure welcome and shutdown screens, you must then define branding options.
- Configure power settings If you choose Yes for Turn off timeout settings, you can then define Screen timeout and Sleep timeout options.
- Select Next.
- On the final page of the wizard, you can optionally password-protect your package. Select Create when you have finished.
- Select the displayed link to open the folder that contains the exported package.
You can now distribute the package to the required computer devices.


